Dungeons Of Eternity
From Forsaken Planet
Lore

You are a member of the Star Guild from the planet Legana. Your planet is in danger because a nearby star is about to go supernova.
Nova Guild investigated the star and discovered a planet,code named Eternity, with a vast array of tunnels that reach across the planet in all directions. In those tunnels they found ancient machines used to harness the sun's energy and prevent it from going supernova, but the machine are failing and communications with Nova Guild and drones sent to scan the planet were lost when they attempted to restart the machines.

You've been tasked with entering these aged tunnels, finding and repairing the lost drones, and re-enabling the ancient machines that will save Legana.

Planet eternity contains a series of underground tunnels which interconnect across its surface and underground. These passageways seem endless and are filled with overgrowth and vermin you'll need to clear as you make your way to the drones.
An Outpost has been setup circling the planet to aid you and your team members.
Together you can save Eternity and Save Legana!
The Game
There are three basic missions: Dungeon Raid, Crystal Hunt and Soul Harvest.


Spend most of your time running Dungeon Raids to quickly level up and acquire an array of Weapons. We'll discuss the other types of missions later in this guide, but for now: choose the lowest Difficulty Tiers (1 or 2) to get a feel for the game. It should take you about 15-20 full dungeons runs to get to Level 15. You'll get there faster in multiplayer, but all levels are reachable in solo-play.
Gather your friends or just zone into the outpost and play with whomever you are grouped with.
You'll zone into The Outpost near your personal room which you can use to craft and equip weapons from Weapon's Modules, craft potions when you gain sufficient talent points from running Soul Harvest missions, change your appearance cosmetically, and upgrade your suit with buffs known as EXO Suit Perks.
At the beginning levels you don't have enough EXO Points to make use of the EXO Suit area (to the left of the door). You can craft Small and Large Health potions using the fabricator (to the right of the door). You don't have enough crafting points (gained from Soul Harvest missions) to craft more advanced potions.
Concentrate on these tasks (until about level 15):
- Run Dungeon Raids for experience and loot
- Gain Weapon's Modules from looting chests
- Gain Experience Points (XP) and Level Up
- Craft Weapons using Weapon's Modules
- Find the weapons that suit you best
What you missed from not running the tutorial
A lot of first time players miss a couple of tricks that make the quality of gameplay so much better. You should run the tutorial, it's reasonably quick (10 minutes) which includes combat training (both melee and ranged) and will show you the movement and actions that you might otherwise miss.
The tutorial also has its own dungeon (that takes 10-15 minutes to fully clear) which doesn't include as many hazards as some of the Dungeon Raids you'll pick from The Map Table.
Options "Auto Run" and "Hold for Options"
"Enable Autorun" will allow you to move faster through the dungeons without having to keep holding down the thumb-stick. You're fingers will thank you; your controller will last longer.
"Options Long Press" will prevent the game menu from showing up when your thumb slips over the button.


Climbing
Climbing up chains and ladders is a fundamental part of the game. You'll frequently find treasure at the top of each and some rooms will require you to climb to move through to the next room.
How to climb efficiently
Look UP and press 'A' to move up a chain speedily. Look DOWN and press 'A' to move down a chain speedily.
How to teleport off a chain or climb a ladder fast
While one hand is holding the chain, use the other hand's thumb-stick to choose a place to teleport. Let the thumb-stick flick back to center position to engage teleportation.
You can also use this technique to teleport vertically or horizontally about 40 feet.
Ladders are similar
Hands and Wrists
Your hands and wrists have hints as to how the game is progressing.
Hands show health
-
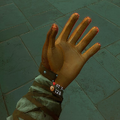 50% health or above
 -
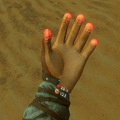 Below 50% health
 -
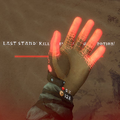 Last stand


-
 50% health or above
 -
 Below 50% health
 -
 25% health
 -
 Last Stand


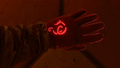
Wrist gadgets show health, coins looted and kills


How To Dungeon Raid
There are some key points to dungeon raiding.
Know the Rewards System
The Rewards System consists of gaining Loot (coins, potions and weapon's modules) as well as XP to level up.
Your level determines the strength of the Weapon's Modules that drop from Chests. Levels are determined by experience points aka XP. You start out at Level 1 with 0 XP:
- Level 2 requires 1000 XP
- Level 3 requires 2500 XP
- Level 4 requires 4500 XP
- each additional level requires 500 more experience points than the last level to traverse
(more specifics in Level Mechanics)
The critical pieces of information are:
- Difficulty settings do not change the rewards you receive
- Most XP is gained through completing the final room in Raid Dungeons
The final room is also called the "Save The Drone" Mission. If you are dead-set on min/maxing XP you'll want dungeons with the least rooms and quickest access to the final area. But, this min/maxing technique ignores loot chests where you'll gain new weapons. You also want to maximize your item rewards by looting as many chests as possible.
If you can find a dungeon with 7 weapons modules, that is generally considered above average. Ten or more is a GREAT dungeon.
Set the difficulty to 1 (the easiest) and you will receive just as many chests as you would on difficulty 7.
Know Chests
There are three Tiers of chests denoted by their physical size and number of skulls on them. Tier I Chests are the smallest and have NO skulls. Tier 2 Chests have one skull directly in the middle of lid where you place the key. Tier 3 Chests are the larges and have three skulls: one on the lid and two at the front feet.
-
 Tier 1 Chests have 75 coins and a cosmetic or 100 coins.
 -
 Tier 2 Chests have at least 100 coins, a potion and either a cosmetic or a weapon
 -
 Tier 3 Chests are the ultimate for loot takers, with 200 coins, a potion, a cosmetic AND a weapon.


There are Three sizes of chests:
- Tier 1 Chests has no weapons modules for low level players
- Tier 2 Chests will likely have a weapon's module
- Tier 3 Chests will always have a weapon's module
Thus you want to loot as many Tier 3 Chests as well as Tier 2 Chests as possible.
Your experience is maximized by running dungeons with the least number of rooms and the most Tier 3 Chests. This is because the final fight is where you gain the most XP (about 2000 points for just saving the drone)
Your loot, however, is maximized by finding the most weapons modules. Lower level players only receive weapons modules from Tier 2 Chests and Tier 3 Chests.
Chests require Keys to open them and sometimes they are behind doors which require another key to unlock the door.
If you are running solo: judicially use your keys for the largest chests. For multi-player with level 40s and above, your experience will be increased by the shear number of mobs your group will dispatch. This will more than make up for advanced player's desire to loot every chest, even the smallest, immediately.
Your Weapon's Damage for any Weapons' Modules you find will be between ABOUT 1x and 2x what your level is at the time of the drop -- this scales to level 60. The scale factor is dependent on the type of weapon, like crossbows are closer to 1x. Long Swords are closer to 2x.
Know Enemies
Enemies on planet Eternity come in many classes and can be categorized with respect to their color and abilities. Classes group enemies into Critters, Monsters, The Undead and Sorcerers
-
 Critters are biome dependent creeps and crawlers.
 -
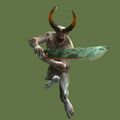
 Monsters are large and ugly.
 -
 The undead are neither alive nor dead.
 -
 Mage classes use staves for a magical range attack.


Dungeons Of Eternity use color to signify strength of mobs as well as enhanced damage capabilities.

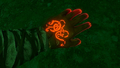
Duller shades of color represent lower tier enemy toughness with Red representing Elite mobs and Bright Purple representing Legendary mobs.
Other Colorizations, like Bright orange-red, Bright Blue and Bright Green signify the elemental attack abilities of the mob.
| Name | Color | Notes |
|---|---|---|
| Fire | Bright Red | Explosion/area damage |
| Ice | Blue | Freeze a few seconds (no embrittlement) |
| Poison | Green | stuns and causes damage over a few seconds |
Know Potions

You'll mainly be using Small Health Potions and Large Health Potions, but through chest loot you can receive any of the other Potion types. All potions have good use but consider the Invisibility Potion a game changer for all levels, since it offers you a resbit from attacks and gives you enough time to kill a few enemies as well as resurrect your fallen teammates.
Smashing potions on the ground allows everyone to receive their effects
Other Items
-
 Key used to open doors and chests
 -
 Power gem used to charge magic staves.
 -
 Skeleton key used to unlock passage to the end rooms of the dungeon.
 -
 A map to the current dungeon.
 -
 a single coin
 -
 A stack of ten coins.


Pay attention to hazards
Exploding barrels cause 83% damage.
Poison barrels cause a total of 25% damage over time: 4% every 3 seconds for 15 seconds then a final 5%.
Laser traps cause xxx
Fireball traps
Fall damage:
- one full floor (onto stone): 87% damage
- half a floor (onto stone): 16%
- falling onto water will give you less damage
In addition, some vases, boxes and barrels contain critters, when broken they will attack.
Some hazards cause immediate death:
- Spike pit
- Ceiling Spikes Crushes
- Wall Spike Crushes
If you are not in combat when you die you will be automatically revived with 25% health.
Know the Combat System
The Combat System includes you and your enemy's health, damage, buffs and debuffs.
You start off with 100% health. You don't generally regain health unless you have a specific healing Weapon's Perk or EXO Perk or until you use a health potion.
The damage you do is the damage number on your weapon +/- the strength of your throw or swing (although this is not quantified anywhere in the tutorial). Your damage is augmented by your weapon's perks and your exo suit perks.
Enemies arrive in waves with wave numbers varying between 1 to about 7. Each wave will have between 2-5 enemies per player at once.
Damage received is a percentage of your total health, as:
| Enemy | attack | damage |
|---|---|---|
| Humanoid | elbow, bare hand, bear hug | 8%-16% |
| Humanoid | Axe, Sword, Hammers | 8%-16% |
| Hummanoid | Arrow shot | 8% |
| Scorpion | pinch | 25% |
| Scorpion | stinger throw | 8% |
| Bee | Explode | 50% |
Know the weapons
A variety of Weapons can be crafted and the adventurer can store them in three slots, Left Hip, Right Hip and on their back.

Weapons Groups:
There are broadly nine different weapons classes (which determine how a weapon is used in combat and stored on person while not fighting). Of these classes there are many individual of weapons types that can be said to the same class, for instance maces, hammers and clubs are all considered different types of weapons but in the same class; in this case they can all be used in melee and their physics of throwing them is the same. Each weapon type has a different damage charts and there are many models (how they look) for each specific weapon type.
Magical Staffs are a little different. There are eight individual magical staffs and they are different in how they are used and the effects they cause.


Weapons Rarity:
Weapons have a rarity classification which determines how often you may find them in dungeons as well as the strength of the features on they weapon itself.
Common Weapons are the most basic and have no enchantment qualities.

Classed just above Common Weapons are Unique Weapons, next are Rare Weapons and lastly Legendary Weapons which are the strongest in the game.
Unique, Rare and Legendary weapons can be found with Elemental features, either Fire, Ice or Poison and can also have enchantments known as Weapon's Perks.
Weapons Perks:
Perks are enhancements on Unique, Rare and Legendary weapons. Some are applicable to all weapon classes, like Attack Power and Elite Damage. Others are available only on specific types of weapons, like Slowing and Reload.
Some Other interesting Perks:
| All Weapons | attack power | Increases damage by 5-35% |
|---|---|---|
| criticals | Gives 20-32% chance to critically strike for 300% damage | |
| Axes | throw damage | Increases throwing damage by 5-35% |
| explosions | Gives 20-32% chance to explode for 200% damage | |
| Crossbows | slowing | Gives 20-32% chance to slow enemy |
| reload | Gives 1-7 extra shots per reload | |
| Bows | shot distance | Increases shooting range by 10-70% |
| slowing | Gives 20-32% chance to slow enemy | |
| Daggers | vampire | Gives 20-32% chance to heal 25% of player health |
| poison | Gives 20-32% chance to poison enemy | |
| Hammers | slowing | Gives 20-32% chance to slow enemy |
| area damage | Gives 20-32% chance to explode for 200% damage | |
| Swords | vampire | Gives 20-32% chance to heal 25% of player health |
| stab damage | Increases damage by 50% | |
| Two-Handed Swords | unblockable | prevents parries |
| vampire | Gives 20-30% chance to heal 25% of player health | |
| knock-back distance | Increases distance enemy is thrown when pushed | |
| Shields | knock-back distance | Increases distance enemy is thrown when pushed |
| absorb | Heals 4-29% of player health when blocking |
Some perks will add a distinctive color to the weapon.
Weapons Elements:
There is Fire, Ice and Poison. they add a distinctive color
Know the colors
Colorization is used to hint at various aspects of the game
Realms have their own colors.
Missions have their own colors.
Potions have their own colors
For enemies: color means strength and/or elemental
For weapons: color means rarity, elemental and/or perk, this is also true for arrows which will glow when a perk has PROCed.

Know Combat Tricks
- Enemies are more exposed when you are above them (for instance, on stairs) and you can hit them on the top of the head.
- Enemy legs are fair game
- all enemies are right handed and hold their weapons accordingly
- after an enemy attempts a strike, they expose their head and shoulders for a short time.
- to hit something crawling on the ground, throw your weapon sideways and flick it to make it spin
- to hit bats, step away from them and throw as they are flying towards you. don't try to swipe at them from a standing position and don't throw your weapon as the traverse your field of view.
Find your combat style
You have three slots to hold weapons, starting out with a Sword in your Left Hip Slot, a Throwing Axe in your Right Hip Slot and a Bow in your Back Slot. You'll need to decide which Weapons suit your gaming style, but generally you want at least one ranged weapon (either a hip throwing weapon or a back-slot bow/crossbow or staff).

Sharp weapons are extremely effective against Zombies, blunt weapons are more throwable and effective against skeletons, although daggers are the most throwable weapon. Swords do the highest damage. All sharp weapons can stick into your opponent which can leave you needing your offhand weapon to continue the fight until it becomes available.
There are those that swear by the Bow Mechanics in this game as truly realistic. Others who may play in a sitting position may use Reload crossbows as they are the simplest to point and shoot.
Magical Staffs offer a variety of attack styles include direct attacks with the Fireball Staff to crowd control with the Ice Staff and also a healing option with the Healing Staff.
You can use The Combat Simulator to examine how Perks relate to specific attack styles and against specific Enemies.
Use The Gear Drop Calculator to figure out how likely a weapon will appear with a specific set of perks.
For the first thirty levels or so the weapons you find will have about the same damage as your level number.
Ask others for their BEST dungeons, save them using the Saved Dungeons Console.
What makes a good or GREAT dungeon? A dungeon that fits your style of gameplay and offers enough reward for the effort you are putting in.
How to start a game
The player with the crown on their head is the leader. The leader should choose a Dungeon Raid:
Move to the large map table in the middle of the outpost

Select any realm from the four listed, they are colorized:

Realms are designated by their own colors (on the table map). Their names are Underworld, Sandstorm, Vilehalls and Lavaforge. Realms are slightly different in difficulty, feature their own flora, fauna and environmental hazards which increase their XP value and loot drops. With Lavaforge being the most difficult and most profitable Realm.


Select a red mission from the map
Red missions are dungeon raids.
-
 Dungeon Raid: loot and combat heavy mission
 -
 Crystal Hunt: gain EXO-suit points to assign for buffs
 -
 Soul Harvest: gain points for crafting potions
Select a difficulty

Tiers 1 is the easiest difficulty and will be the default while you are between levels 1 to 10. Dungeons of Eternity's difficulty scaling is pretty reasonable and my suggestion is to trust it until you are beyond level 15 when you acquire Vitality EXO Perk.
Get to the tele-porters


Significant Milestones
Level 1: Run Forgotten Tombs
A full run, including smashing the breakables and collecting all coins, of the tutorial dungeon, "Forgotten Tombs" will net you about 3,500 XP which should level you to half-way between levels 3 and 4. Pick other dungeon raids or ask your teammates if the can share their best dungeons.

Level 5: Unique Weapons with Elements and Perks appear
It should take you two or three full dungeon runs to get to level 5 when Unique Weapons appear.
Level 12: Rare Weapons appear
Level 15: EXO Vitality becomes available
By level 15 you'll know what you like and what doesn't work for you.
After you acquire vitality it is easier to play the mob heavy waves of the Soul Harvest missions.
Level 24: Legendary Weapons appear
Level 30: EXO Haste becomes available
Cosmetics
Cosmetics are used to alter your in-game appearance without affecting any fighting stat or status effect.